Tuesday, June 28, 2016

Finishing Ceiling Repair in Living Room


Closing in on the last of the hairline wall cracks on the ceiling . . . brother Will making it to the finish line.  Looking so good.

Will says, I got this far, I might as well fill it in completely with the Durabond.  And I agree--the Durabond is strong and is lighter than re-sheeting with drywall.  Will made a good choice.

As the sections receive a finish coat of Durabond--it starts to dry and takes on the cool white opaque finish.


Will worked many days and nights on the living room ceiling.  He was giggling again today because the Durabond ceiling repairs are done.

Linda (me) finished wall crack repairs with Durabond and web tape today--at least as far as I can
reach on my smaller ladder.  Brother Will will finish the other hairline wall cracks as he moves from ceiling to the frieze and then down to the area where I couldn't reach.

We talk and talk all day long about finishing the wall crack repairs.

Just to remind you, there are large cracks that have been badly repaired in the past--those cracks were bumpy, lumpy.  Some so bumpy that you could see them underneath two layers of wallpaper.

Each one of those poorly repaired bumpy cracks are scored deeply with a 5 and 1 tool, and scraped to remove previous repair down to the original plaster and prepared for new smooth repair.  Our goal is to give this old house the dignity it deserves.  It takes time, but so worth it.

Will holds a stainless steel pan with just enough Durabond to complete several feet of repairs.  Each pan is hand-mixed water and flour-like Durabond 90.   The number 90 gives an indication how many minutes you have to work with the mix before it begins to dry.

 Will is giving this room a full face-lift, checking every hairline crack.  The result will be fabulous and last a long long time.

We'll hand sand Durabond repairs, then trowel a skim coat of pre-mixed Drywall Compound.

 The scaffold is just the right height for Will to make repairs--the rolling scaffold is 3 ft. x 5 ft.


Oh my goodness--we got a lot done this month.  As we move forward you'll see big changes happening pretty fast.

This load bearing wall really needed lots of attention.

The area below the chair rail requires more steaming to remove old paint and expose cracks.  Next Monday I'll work on those areas while Brother Will begins skim coat of drywall compound.

Wowzer!
The plumber has been quite busy. Will was showing me all the plumbing details.  Great improvements that make this house really a home again.  Burst pipes a couple years ago with renters
brought this house to its knees.  

It is exciting to see water lines where the washer and dryer will go downstairs.  And by golly there are waterworks in the shell pink bathroom.   The plumber is doing a fantastic job--so pleased!


Sunday, June 26, 2016

George Visits The House


I took my small, well worn print of George Washington over to Will's house today.  George is just visiting; he's there to keep us company while we work on the Wild Rose Victorian.  

Several days ago, I ordered a large 24 x 36 canvas of George (reproduction of the Rembrandt Peale painting) for Will's fireplace mantel in the living room where the ceiling height is 11 ft.  We measured and drew lines on the rough plaster and agreed a large painting would look great

Will has been chasing the hairline cracks on the ceiling for many days now.  He is working his magic with Durabond and web tape.  

We are turning the corner, and soon we'll trowel on a skim coat of drywall.  Then a second skim coat.  Our technique is good because we both have lots of experience doing this kind of work at my old 1893 Victorian in Scandinavia, WI.  (12 rooms).  After the skim coats of drywall, we'll use a special primer, and then two coats of quality paint.

It was 93 degrees F today.  A little cooler inside where we were working--attended by several fans.  
In the photo above you can see the green web tape near the dangling door bell.  I asked Will to get it removed and out of the way, so I could continue.  

My journey took me half way around the living room taping and mudding.  The repairs are smooth and require just a touch of light hand sanding here and there.  


Will confessed that when he helped me with the wall repairs at my old Victorian--he really didn't care for the work that much--very repetitive, quite work.  BUT, it kind of grew on him.  I agreed.  I know exactly what he means.  It's like--who in their right mind would love this work?  Yeah, we do.  We even talked about doing another house someday.  I'm interested for sure.  


I worked on the living room walls today, and . . .

And Will continued to work the ceiling and freeze areas.


The living room color will be Barely Brown--original formula by Valspar--same color I used in my Victorian--in the office, and the upstairs hallway.  It is the color of coffee with cream, but could also be described as the color of peanut butter.  It will look great with the antique sofa covered in a chenille fabric of similar color featuring a pattern of black acanthus.  

Will wants simplicity in the furnishings--and it will take some restraint on my part to keep that promise.  I gifted him an antique sofa,  and an oak lamp table boasting thick acanthus carvings.   


We stopped working in the living room for a while today--to talk about the big old plaster mess in the corner of the office (northwest corner above the book case).


My brother Will measured the depth of the old plaster at 1/2", and then he measured some quarter sheets modern paper coated drywall left behind by the previous owner--and it turned out to be 1/2" also.  Bingo--we have materials to make the repair!  He scored the wall and I got up there and pulled off the crumbling plaster, then vacuumed.  Confident we have materials to make this repair--we went back to our repair work in the living room.

IDEAS:
I talked to Will about visiting the county court house to see if we can find a old plat book with map of the city of Wild Rose.   A map image like that, enlarged and framed would appreciated in his living room.  

When I returned home this evening I found the county plat 1906 book online!  Now we know a Wild Rose city map exists.  Next, I'll have to visit the county court house to get it photographed, so I can enlarge it.  Wonder if they have any older plat books?  

The first thing I saw on the 1906 map was a street called CAREY.  Our house was built around 1892 by Dr. Alfred Carey b. 1852, d. 1899.  He was also the Postmaster.   Wild Rose's first post office was established in 1873.  

Repairing East Wall in the Office

Southeast wall repairs and the warm sun coming through South Bay Window in the office.

***

Thanks for stopping by to see what's up at Wild Rose Victorian House.  We take photos every day we work at the house.  Lots and lots of projects coming.  Special thanks to my friend Donna who is leaving comments.  Your comments make us feel so good about saving this old house.   


Thursday, June 23, 2016

Working on Cracks in the Ceiling and Walls This Week

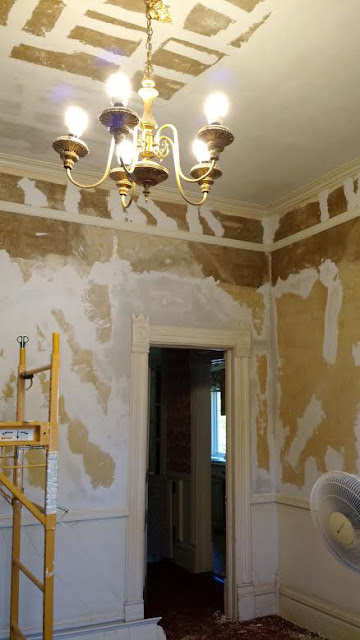
 Well--the wallpaper is gone . . . and that's good.  The old ceiling paint is scraped clean.

From the scaffold--my brother Will picked the toughest job--repairing ceiling hairline cracks, and reinforcing with web tape and Durabond 90.    I told him it would take forever, and he proved me wrong.

I suggested we install new drywall, but he was dead set on repairing the original plaster.
I told him to sleep on the idea.  

He slept on it, and decided he'd do a grid of web tape and Durabond 90.  In between grid lines he found other surface chips and hairline cracks to reinforce.  


We are saving the metal cast chandelier in a matte gold.  

The milk white GLOBE shades, some broken, all were discarded, now I am in search of replacement 7 shades in all.  (chandelier and fireplace sconces).

25 watt light bulbs were replaced with compact fluorescent bulbs that are delivering better lighting while we work.  

What would you suggest for replacement shades?

***
On to the office

I spent a couple hours chasing hairline wall cracks with web tape and Durabond 90.  There are a number of "holes" too.  One as big as my fist--that I filled twice, and it will take more filling yet. 

 There are a number of overgrown nail holes I packed with knife curls of stiffer Durabond.  Yes, you can use every stinking bit of Durabond you mix.  

I'm pleasantly surprised how nice this is going.  Next visit, I'll jump on a taller ladder to do taping and troweling walls (near the ceiling).  This isn't hard work.  Just up and down the ladder.  I'm a short person, short reach, and lugging around the bigger ladder often is my only lament. 

I managed to spill Durabond on my shirt yesterday while climbing up the shorter ladder, and will have to pay special attention to the clothes I wear in the future (sacrificing older, less flattering clothing for the good of the project).

While waiting for Will to arrive yesterday, I finished removing the 1980s bi-fold shutters from the office windows.  Stored the shutters for yard sale.  

The change in the house--is like going from a cave into the light without those shutters. The house is smelling better too.  The house is changing.  We are changing too.  

The water/fabric softner used to wet down the wallpaper helped too.

Dust will continue to swirl throughout the rooms during repairs.  We continue to clean up as we go along--and even cleaning windows and surfaces with paper towel and blue glass cleaner--and hepa filter shop vac.  These rooms will be cleaned, and then will mess it up, and cleaned some more.  

I never get tired of looking at the beautiful stained glass windows in this old 1892 Queen Anne Victorian.  The bay window is welcoming.

Won't it be fun to go buy primer and wall color?
I can see it this room getting the 'suit and tie' treatment next month.

My brother Will is quite interested in George Washington, Benjamin Franklin, and Abraham Lincoln.
Perhaps portraits of these gentlemen to decorate the walls?  

Maybe a big 24 x 36 portrait of George over the fireplace mantle?


Benjamin Franklin 16 x 24 portrait on the office wall?


Plenty of room in the office for Abraham Lincoln too.


My plan is to return to the old house to work on Friday or Saturday.  More photos to come


Friday, June 17, 2016

Tackling Ceiling Repairs - Slow Process


Now that Willie nearly finished scraping all the old paint off the ceiling, he explains to me how he will repair hairline cracks.  


In the living room--Will begins applying web tape embedded with Durabond 90.


Every once in a while, I hear Will giggling, telling himself what a great job he's doing.  Hearing him giggle--makes me giggle too.  He is so excited about the restoration.  The work is time consuming, requires great patience. 


Thursday, June 9, 2016

Finishing Steaming Wallpaper - Living Room

This is the north wall of the living room.  Ceilings are 11ft. high

North Wall in the living room taken today June 8th, 2016.  
The dining room in beyond this door.

You may have noticed the era of Queen Anne Victorian houses like this one--are all about doors and privacy.  There are five doorways leading off of the living room.  

 North wall of the living room - with door open to the dining room beyond.

 The woodwork is original.  Consulting with Victorian architecture historian John S from Victorian Revival Group, he wrote to me saying, "the window casings and corner blocks are consistent with an 1885-1895 era house."

There are a number of Stained Glass windows (as shown here in the future office).  John S. our Victorian architecture historian commented, "the windows with the stained glass borders are classic Queen Anne with such windows being one of the defining characteristics of the style."
Stained Glass Doors in the Vestibule.

Two shallow closets flank either side of the stained glass window in the vestibule.


 I asked John S. about the light and dark plaster finishes, and he said, "the brown wall/ceiling finishes are more difficult to explain but in the early 1900's as part of the Arts and Crafts movement's mania for natural finishes, a sand finish was made (sand or crushed garnets mixed with plaster lime) and left unfinished.  If you have checked the finish and there's a thin white of finish coat of plaster under the sand finish, then it was added over the original."

What is certain--the original walls have been repaired several times--seeing the different grades of wall finishes from dark brown coarse scratch coat (especially on the ceiling) to smoother lighter finish coat on the main body of the living room walls.  The darker brown coarse scratch coat appears in some of the freeze, but again not all of the freeze around the room.  We're definitely scratching our heads about the dark crown coarse scratch coat.

With the house settling over the years, we expected to find previously repaired wall cracks coming from the corners of door openings.  These former wall cracks were filled with a tough, but shiny compound (unknown).  Those filled spots have been more difficult to remove the old wallpaper.  The repairs were sometimes sloppy and unsanded, making the wallpaper look like bumpy veins through the wallpaper.  We'll make sure those are secure and smooth.

To the right is the south wall, and you can see the left corner of the fireplace.

Through the wide doorway are double doors leading to the future office.
Do you suppose it was at one time Dr. Carey's patient examination room (1892-1899)?


At the left--the fireplace mantle and the doorway with another set of double doors to bedroom 1.
Photo of Will steaming second layer of wallpaper--south wall of the living room, just above the fireplace mantle.

The rolling scaffold was so handy to have on this project.  I used it in my 1893 Victorian Farmhouse Restoration in Scandinavia, WI.
Today, William finished the last section of the freeze.  On the second day of  wallpaper stripping, my husband Jon located our wallpaper steamer.  The steamer sure makes removing wallpaper easier than spritzing with water infused with fabric softener.  The freeze was a challenge as it was PAINTED WALLPAPER.

It is a back-breaker, neck-breaker  removing the peeling paint from the coarse brown scratch coat on the ceiling.  The steamer helps, but oh my, standing with your arm up in the air, holding the steamer plate in position on the ceiling hurts a body quickly.

I tried 20 minutes steaming the ceiling, and handed it over to Will.  On the way driving home a little later, my bicep muscle went into a painful cramp.  Patience is everything.  We work on the hard stuff like the ceiling, a bit at a time.  Gotta pick your battles.  One workday flows into another, one day at a time until the project is finished--then continue the punch list to restore all the bits and pieces of the living room.

I guarantee, in two weeks time you'll see the living room turn the corner and take on the beauty of a inviting living room.  Somehow, it deserves a different name than "living room"--that sounds too modern.  Could we call it a receiving room?  Remember: people used to come through these doors to see Dr. Carey the Wild Rose physician and postmaster.
***
Tune in again, to see what happens next.  Linda, a.k.a. Mrs. D (me) begins restoring the old wavy glass windows.  And William will start large crack repairs with Durabond, laying down web tape, and Durabond to secure large and small cracks.  He'll move on to the process of laying down two skim coats of drywall compound.  The result will be, as smooth as a baby's behind when its done.