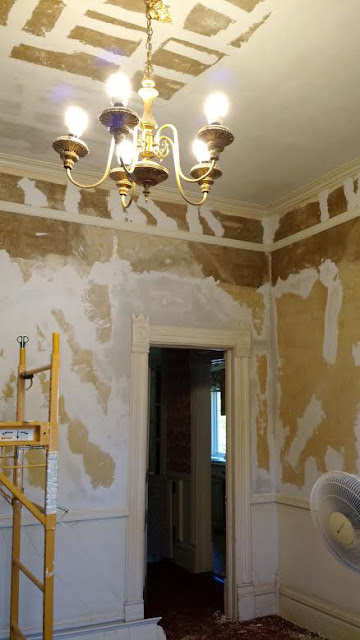
Closing in on the last of the hairline wall cracks on the ceiling . . . brother Will making it to the finish line. Looking so good.
Will says, I got this far, I might as well fill it in completely with the Durabond. And I agree--the Durabond is strong and is lighter than re-sheeting with drywall. Will made a good choice.
As the sections receive a finish coat of Durabond--it starts to dry and takes on the cool white opaque finish.
Will worked many days and nights on the living room ceiling. He was giggling again today because the Durabond ceiling repairs are done.
Linda (me) finished wall crack repairs with Durabond and web tape today--at least as far as I can
reach on my smaller ladder. Brother Will will finish the other hairline wall cracks as he moves from ceiling to the frieze and then down to the area where I couldn't reach.
We talk and talk all day long about finishing the wall crack repairs.
Just to remind you, there are large cracks that have been badly repaired in the past--those cracks were bumpy, lumpy. Some so bumpy that you could see them underneath two layers of wallpaper.
Each one of those poorly repaired bumpy cracks are scored deeply with a 5 and 1 tool, and scraped to remove previous repair down to the original plaster and prepared for new smooth repair. Our goal is to give this old house the dignity it deserves. It takes time, but so worth it.
Will holds a stainless steel pan with just enough Durabond to complete several feet of repairs. Each pan is hand-mixed water and flour-like Durabond 90. The number 90 gives an indication how many minutes you have to work with the mix before it begins to dry.
Will is giving this room a full face-lift, checking every hairline crack. The result will be fabulous and last a long long time.
We'll hand sand Durabond repairs, then trowel a skim coat of pre-mixed Drywall Compound.
The scaffold is just the right height for Will to make repairs--the rolling scaffold is 3 ft. x 5 ft.
Oh my goodness--we got a lot done this month. As we move forward you'll see big changes happening pretty fast.
This load bearing wall really needed lots of attention.
The area below the chair rail requires more steaming to remove old paint and expose cracks. Next Monday I'll work on those areas while Brother Will begins skim coat of drywall compound.
Wowzer!
The plumber has been quite busy. Will was showing me all the plumbing details. Great improvements that make this house really a home again. Burst pipes a couple years ago with renters
brought this house to its knees.
It is exciting to see water lines where the washer and dryer will go downstairs. And by golly there are waterworks in the shell pink bathroom. The plumber is doing a fantastic job--so pleased!


2 comments:
This blog is maintained by (me) Linda for my brother Will, owner of the Wild Rose Victorian House. We hope you'll take time to post a comment, or ask a question. We love hearing from you, and it encourages us to stay the course, and give this old house the dignity it deserves.
Only recently (today) I figured out how to enable comments.
Thank you for stopping by. Makes us so happy to know you care about old houses too!
It’s really an informative post. You are explaining nicely about restoration rules. I am planning for remodel my house and also contact "IPC Restoration and Renovation Contractors” and also discussed about restoration and other problem. And they assure me, they will give their 100%.
Post a Comment